04 February 2025
How to fix caravan damp wall damage
7 minutes
Finding damp can be one of the most frustrating and worrying experiences for caravan owners. Unfortunately it’s a very common problem — especially in older caravans. That’s why we’ve created this comprehensive guide on how to fix caravan damp wall damage.
Below, you’ll learn more about how to spot it, how to repair damp in a caravan, and how to prevent it in the first place.
Can damp in a caravan be repaired?
Damp can be harder and more expensive to resolve than other problems such as mechanical faults. But don’t despair! It’s perfectly possible to fix damp wall damage, either through DIY or with the help of a professional.
Common causes of damp in caravan walls
There could be various reasons why your caravan walls are suffering from dampness.
These include:
- Poor ventilation: this allows moisture to build up inside the caravan as it has little means of escape.
- Condensation: this is particularly common during the winter months as your caravan comes into contact with colder temperatures. Caravans and motorhomes also tend to be used less often over the winter. This can exacerbate the problem as they’re receiving less ventilation than in the summer months.
- Leaks: these allow water to enter your caravan from outside. Leaks may occur where sections of your caravan are joined together or where there are seals, for example around the windows, vents, joints, and awning rail.
Read more: A guide to water leak detection systems
Why timely repairs are important
If your caravan walls — or any other part of your caravan for that matter — have a damp problem, it’s essential to fix the issue as soon as possible. Not only will this help contain the spread and reduce the amount of repairs needed, but it’ll also save you money.
After all, the more extensive the issue, the costlier it’ll be to sort out. It’s also very important to tackle damp at its onset for your health. Dampness can cause mould, which can have a serious impact on our wellbeing, for example by causing respiratory diseases.
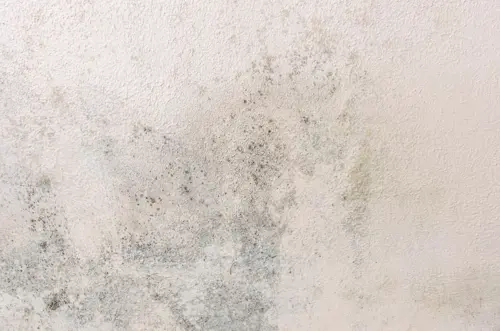
How to identify caravan damp wall damage
Before you can fix damp wall damage in your caravan, you first need to identify exactly where it is. Damp can be a real trickster, showing little evidence of an issue on the surface while extensive damage hides underneath. That’s why it’s crucial to regularly inspect your caravan for damp so that you can catch it as early as possible.
Signs of dampness in a caravan
There are a few common signs of dampness to watch out for:
- Smell: if your caravan starts to smell stale or musty, there’s a good chance damp is behind it. Imagine smelling a wet towel — that’s roughly the scent you’re on the alert for.
- Sight: look for patches of discolouration and any dark spots, which are a good indication of mould and mildew.
- Touch: give your caravan walls a press and see if they feel soft and spongy. If so, there could well be moisture lurking underneath.
When checking for damp, be sure to inspect every inch of your caravan. It’s very easy for water to make its way into the smallest nooks and crannies. So, check behind movable objects as well as inside fixtures and fittings if possible.
Also read: Signs of Damp in Your House: How to Spot & Fix
Tools for detecting dampness
The signs above are a good proxy for identifying moisture. But for peace of mind, you might want to consider investing in a tool for detecting dampness. Moisture and damp meters measure the level of moisture present in different areas of your caravan.
A moisture reading of 15% or less is good. Anything above 15% is a cause for concern and should be investigated further.
Professional damp inspections
For the most fool-proof approach to identifying damp in your caravan walls, your best bet would be a professional inspection.
An expert or registered dealership can survey your caravan for water ingress (water entering your caravan from the outside) and complete a habitation check (inspecting the interior of your caravan to make sure it’s comfortable and, most importantly, safe).
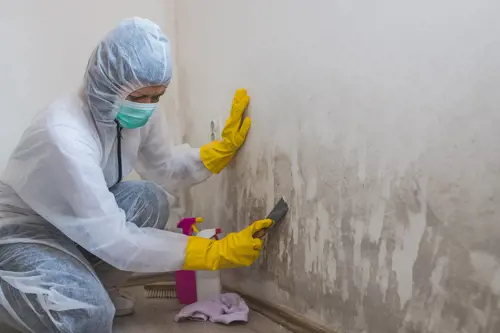
DIY step-by-step guide: how to fix caravan damp wall damage
If you discover damage to your caravan walls caused by damp, you might choose to get them professionally repaired. Or you might decide to carry out some DIY damp repair yourself. If you’re going for the latter, follow these steps to ensure you thoroughly remove all the damp and get your home away from home back into top condition.
Step 1: prepare your walls
The first step is to inspect your caravan walls and identify any areas suffering from damp, using the various methods we’ve covered above.
Clear the area so you have space to work, for example by removing anything hanging from the walls or resting against them such as furniture.
Step 2: remove damp areas
Depending on how severe the problem is, this could involve removing sections of the interior wall panelling, the wall insulation, or even the framework of your caravan. This is a bit of a balancing act. You want to ensure you’ve completely eradicated every last trace of dampness and rot, while not removing any more than you need to.
Make sure that you’re wearing appropriate safety gear when dealing with mould and insulation. Both can be harmful to your health if not handled correctly.
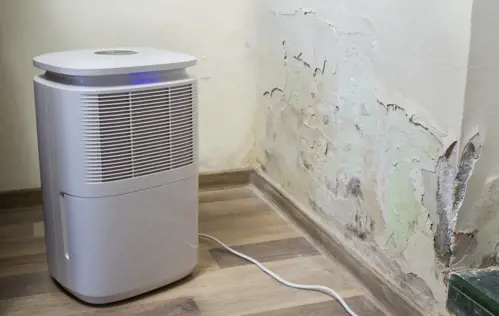
Step 3: let everything dry
Give your walls time to dry out completely. This could take a while, perhaps even a few days, but you can speed up the process by opening windows and doors to provide more airflow. You can also use dehumidifiers and fans to reduce moisture levels and improve ventilation further. Note that it’s not recommended to use heat as this can lead to warping.
Step 4: treat affected walls and fix any seals
Once all damp is fully removed and the area is completely dry, it’s worth treating it against future moisture. You might also want to apply something like a mould spray or fungicide.
Then, check and redo any damaged seals, for example around windows and doors. Sikaflex and other polyurethane sealants are popular among caravan enthusiasts due to their water-resistant properties. Make sure there are no gaps so that water can’t get in from the outside.

Step 5: rebuild your walls
Exactly what’s needed here will depend on how much you’ve had to remove. It could be as simple as replacing any wall boards, for example by cutting out some plywood and gluing them into place. If you’ve had to take out some insulation, replace this too.
And if you’ve needed to remove some of your caravan’s structural elements, these will need to be rebuilt as well. When you’re getting to this level of repair, it might be worth seeking some professional help and advice — see more on this below.

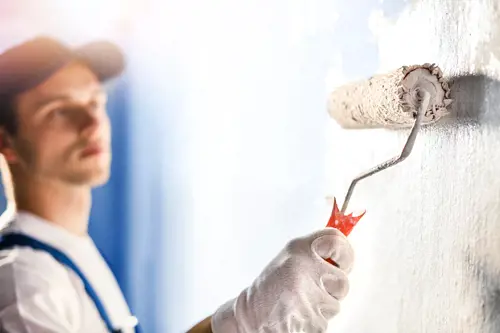
Step 6: complete the finishing touches
Finish off your repairs by touching up the walls. If they’re uneven, use a wall filler to cover up any gaps. Repaint the walls or redo the wallpaper — if you’re using paint, consider going for a damp-proof option for added protection.
Before you put everything back in place, check again for leaks and dampness. Once you’re happy the repairs have done the job, you can return your caravan to normal, sit back and relax!
How much do caravan damp repairs cost?
Costs for identifying damp are fairly minimal. You can buy damp meters for as little as £20, and a professional damp check should cost tens of rather than hundreds of pounds, for example around £50.
It’s harder to give an exact figure for repair costs, as these will vary significantly depending on the amount of damage. But you could be looking at hundreds or even thousands of pounds. That’s why it’s so important to catch damp in its early stages, to minimise the havoc it wreaks as much as possible.
If the damp is fairly superficial, your costs will likely be lower as you’re making largely aesthetic fixes. If the damp has unfortunately spread and led to problems such as rot, your costs will likely be much higher. You’ll be completing more extensive repairs, perhaps even structural ones. And these may require multiple tradespeople and specialist equipment.
It may well work out cheaper to complete the repairs yourself as you won’t have to pay for labour. But you should balance this with the peace of mind you might get from a professional repair. Plus you may decide that only an expert can complete the job, especially if the damage is large-scale. If you do go for a professional, we’d always recommend shopping around and getting a few quotes to make sure you’re getting the best value for money.
Keep in mind that most caravan insurance policies unfortunately won’t cover damp. This means if your caravan is no longer under warranty, you’ll need to pay for any repairs out of your own pocket.
Find out more about caravan and motorhome insurance.
How to prevent damp in a caravan
As with many things in life, prevention is better than a cure when it comes to caravan damp. Here are some top tips on how to keep yours moisture-free.
Improve caravan ventilation
- Make sure your air vents are clear and working correctly. Use a dehumidifier if needed.
- Aerate your caravan over the winter months, as well as any other periods of time when you’re not using it regularly.
- If you can, keep your caravan outdoors, even when you’re not using it. Make sure any covers you use are breathable and waterproof.
Reduce sources of moisture
- Keep activities that involve steam to a minimum, such as hot showers and boiling water. Open windows and doors to let out steam as needed.
- Dry clothes outside or in your awning.
Carry out regular maintenance
- Regularly inspect your caravan for leaks, damp, and other faults — especially if there’s been heavy rain. Apply more sealant if you spot any cracks.
- Consider paying for a professional damp survey, ideally once a year.
Quickfire summary: how to fix caravan damp wall damage
Damp wall damage can be hard to spot, so check your caravan regularly, for example using a damp meter, to catch issues nice and early. Remove any affected areas, and let them dry fully before treating and replacing them.
And be sure to prevent future damp issues from occurring by ventilating your caravan, reducing moisture, and carrying out regular maintenance.
Need comprehensive insurance to protect your caravan? Look no further than Howden for the right policy.
Also read: